Forum - View topicANNual Halloween Pumpkin Carving Contest
|
Goto page Previous Next Note: this is the discussion thread for this article |
| Author | Message | |||
|---|---|---|---|---|
ladygoddess8
 Posts: 25 Location: New Mexico |
|
|||
|
I carved two pumpkins this year. One was practice and the other for the contest but the practice turned out to be pretty cool. So I am glad I could submit both.
|
||||
|
||||
Sa-chan66
 Posts: 50 Location: The Moon |
|
|||
|
How do people get such good photos of their pumpkins?? Mine are either too dark or too light and sometimes miss some detail I wish could be seen on a photo.
|
||||
|
||||
Mugimaru904
 Posts: 10 Location: St. Augustine, Florida |
|
|||
I was wondering the same thing when I was taking pictures of my pumpkin. I tried different ISO settings and filters, but I could not get as much detail as I wanted out of the pictures. I wound up taking around 20 night shots and just sent in the one that looked the best. |
||||
|
||||
RiderG
 Posts: 64 |
|
|||
the trick is just that. take LOTS of pictures, then choose the best out of all of em. i took around 50 shots of mine. they say you're a good photographer if you get ONE good picture out of an entire roll of film, so just take a lot of pics. |
||||
|
||||
|
ladygoddess8
Posts: 25 Location: New Mexico |
|
|||
|
I tried different lighting methods. I used one candle up to 5 candle and also flashlights or christmas lights. I found that the christmas lights worked best though I had to remove about half the strand for the picture to be perfect. I also agree with taking a lot of pictures.
|
||||
|
||||
|
Sa-chan66
Posts: 50 Location: The Moon |
|
|||
|
I've done the same thing. I take tons of pics, put tons of candles in the pumpkin, lid on, lid off, background lights on, diff ISO settings. Even then only one looked decent!
 ;; I need a better camera ;; I need a better camera 
|
||||
|
||||
|
ladygoddess8
Posts: 25 Location: New Mexico |
|
|||
|
I have a digital camera that has a special ISO setting for low lighting that uses no flash nor a really long exposure time. This always gives me the best pictures. The long exposure makes the picture too fuzzy and the flash just looks crappy.
|
||||
|
||||
|
Akukame
Posts: 117 |
|
|||
long exposure should only make the picture look fuzzy if you aren't using a camera stand or sitting the camera on a table or something (and maybe a little bit if there is too much light around). Also, the higher the ISO the more grainy the picture will be. But the lower the ISO, the darker the picture will be. So you combat the darkness by increasing the exposure time. I also think using as much light as possible from the inside will help a lot. My pumpkin was probably in the range of about 2.5 inches thick and I don't think a candle would have done the job I wanted. 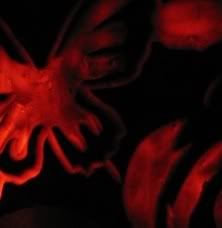 
1 second exposure vs 15 second exposure (at 50% resolution) This year I used a 15 second exposure. I didn't have a tripod, but I put the camera flat on a table, and lit the pumpkin with a fluorescent desk lap that has an arm I can tilt into the pumpkin. Lastly, you just need to have the right thickness of the pumpkin. If you're cutting areas completely out, you need to make sure that the light/candle can't be seen through that area (or it will cause glare), and that the pumpkin is still relatively thick, or the uncut area will glow aswell. If you're shaving areas, you need to try to get as even as possible to minimize blotchiness. Flash always looks bad because the pumpkin is shiny (sorta). |
||||
|
||||
washapa
 Posts: 5 Location: Midwest, USA |
|
|||
|
Funny, I had the same problem as a lot of you did with the lighting & the pumpkin. Mine also had a very thick wall so putting a candle in it was totally out of the question, but we found a light bulb attached to an extension cord that worked wonders. So perhaps a tip for anyone for next years competition...
I also agree with those of you (or maybe it was just one person) who said that the brighter the light in the pumpkin the better the photo will be at night - especially for designs carved on the surface of the pumpkin. I never thought of Christmas lights though - nifty idea. |
||||
|
||||
|
RiderG
Posts: 64 |
|
|||
|
blaarrrrrgh i know there are 70 entries but this is killing me X(
|
||||
|
||||
|
ladygoddess8
Posts: 25 Location: New Mexico |
|
|||
|
I know I think the added stress of my week is so not helping either. Oh and for the pumpkin thickness I just scraped a lot out from the inside. This makes carving SO much easier because the outside does not have to be so deeply carved which usually makes weak and easily ruined sections. Also using wood carving tools helped. You can get a set at Walmart for about $4 and makes detailed carving easier.
|
||||
|
||||
tbartist09
 Posts: 6 Location: Superior, WI |
|
|||
I agree, I purchased a set at an art store - needless to say their effectiveness for making actual woodcuts was on a scale of 1-10, 0. They do however, work wonders for pumpkin carving! |
||||
|
||||
|
Sa-chan66
Posts: 50 Location: The Moon |
|
|||
|
I actually just used a small spoon. It worked really well to get completely inside the pumpkin to scrape the walls. And cleaning up is easy too! Just flip the pumpkin upside down

Also I think we are all feeling the suspense...
|
||||
|
||||
|
RiderG
Posts: 64 |
|
|||
|
ai yah still not up
|
||||
|
||||
|
labantnet
Posts: 57 Location: Anoka, MN |
|
|||
|
Clay carving hoops. All the professionals will tell you the same. Also hooked Exacto knifes.
|
||||
|
||||
 |
All times are GMT - 5 Hours |
|
|
|
Powered by phpBB © 2001, 2005 phpBB Group